Scaling Numbers for the Axoloti

The Axoloti does not have a built in scale the way Max/MSP or PD does, however, that doesn’t mean you are stuck with 0-64 or -64-64.  Good old fashion math goes a long way when using the Axoloti and trying to control different parameters.

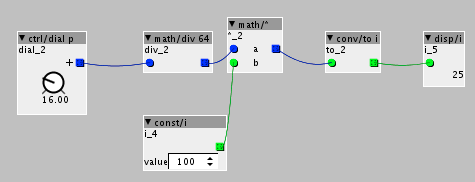
For unipolar dials, they go from 0-64 which can be used in its unaltered state for a variety of things, but to expand the range or scale the range dividing by 64 and then multiplying by the highest number you want will scale the dial to the range of 0 – N.  From here we can use a convert i to convert from a fractional number (frac32) to an integer for different control.

The idiosyncrasy with this method is the larger the range the bigger the step.  This means that if the range is from 0 – 1000 the step is 7-8.  When the range is smaller, lets say 0-100, the step size is 1.  There is a point in which the numbers will start to turn negative.  I do not know why this happens. It seems to cap out at 999  If I figure it out, I will update this post.

For bipolar dials the range is from -64 -64.  This can increase the range of numbers or make the step size a little smaller.  To work with these sliders, by adding 64 it takes the range from 0 – 128.  Then by dividing by 128 and multiplying by the maximum number you want, you can get an appropriate range of output.

In the axoloti environment many of the inputs get added to the the dial from the object.  This means that the number the object is receiving is potentially more than what you think.  To compensate for this, I leave the dial that is built into the object at 0 so most of the control is from the dial.  I will then use the objects dial for fine tuning different parameters.


Screen Shot 2016-03-25 at 7.05.41 PM.png

Axoloti

I recently bought an Axoloti fro axoloti.com.  It is a small (3×7 inch) piece of hardware that renders audio from a designated program similar to pd.  This product is cheap 65 Euros and you can build an enclosure for it.  The environment is different from pd or max/MSP because every is ranged from 0 – 64 or -64 – 64.  Inside the environment is a code editor that allows the user to edit the object and save an instance of it.  Objects can also be created in a program like TextWrangler.  Most algorithms work the same way in axoloti as they do in max/MSP (ring modulation-> two signals being multiplied together) are the same.  That being said, certain objects don’t exist such as clip~, pong~, wrap~, scale and others.  This makes using the axoloti as much about composing and making sound as experimenting with ways of doing things.

axolotibuild

On the left is a stereo input (no phantom power) and a stereo output.  Then there is a headphone jack, micro usb to power and transfer data, sdcard slot, usb host and midi in and out.  The sdcard is used to load patches onto the axoloti and use it in standalone mode.

Screen Shot 2016-03-22 at 11.38.31 AM.png

Here is basic ring modulation of two sine tone signals.  The math/*c is a gain control.  The red lines indicate audio rate while the blue is float.  There is also green being integer numbers and yellow which is boolean.  The program allows for immediate understanding of the type of signal that is being used to control different parameters.

Limitations

The sample size is fixed to 48k.  There is only 8mb of SDram so doing anything spectral or FFT based is difficult.  The buffer size is also fixed at 16 samples.

While there are some big limitations with 8 mb of ram, the sound that can be produced has a certain analog feel and the overall capabilities  can create complex sounds and sequences.

More Axoloti patches to come…

Allpass Filter from 2 Comb Filters

An allpass filter is a filter used to pass all frequencies with equal gain but change the relationship in the phase.  This might not mean a lot, however, allpass filters are used in reverbs, vocoders and different kinds of delays.  They are also very easy to make in Max/MSP using Gen~.

This little post shows how to make an allpass filter in which the delay time is not set, meaning any amount of delay in samples can be used.  This allows the user to have various types of effects from one allpass filter.  Besides serving as a traditional allpass, it can create echo with some feedback as well as reverb and echo with each echo having reverb.  This is all controlled by the delay time.

Screen Shot 2016-03-21 at 4.29.14 PM

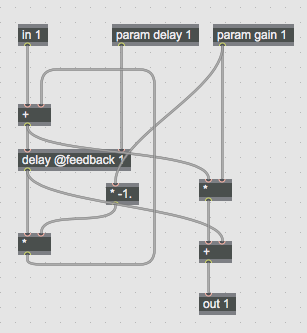
In the above patch an input is being added to a delayed version of itself.  The delay @feedback 1 takes the signal and delays it by a certain amount of samples.  The @feedback 1 argument is used to allow feedback to occur.  Out of the delay, the signal gets multiplied by a gain amount -1 which will cause the feedback gain and feedforward gain to be inverse from one another (cross fade between clean and effect).  The signal + feedback get multiplied by gain and added to the delay.

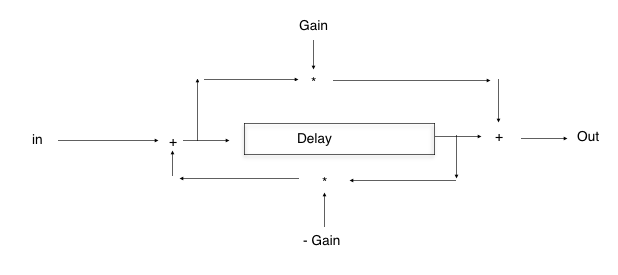
The description might be a little confusing, but to sum it up… a delayed signal is added to itself (feedback) and added to the feed forward signal.  The flow chart is as follows


Screen Shot 2016-03-21 at 4.41.30 PM

It is important to note that the feed forward takes place after the input gets multiplied by the feedback and the feedback happens before it gets added to the feedforward.  This small little patch can also be duplicated in series or parallel to create interesting reverb and echo.  Also, if the feedforward is left out it turns into a one-pole filter.


Calculating Spectral Flux

Spectral Flux is the measurement of when the spectrum changes or how much change occurs in the spectrum.  Flux can be programmed further into transient detection or onset detection.  In order to calculate the flux of a spectrum, the current frame and previous frame are compared (subtracted) and then in a program such as Max/MSP, square rooted to imitate a logarithmic scale.

The following short tutorial shows how to calculate spectral flux using objects native to Max/MSP.  To start we need to make a subpatch to use within the pfft~ object.  In this subpatch fftin~ 1 will be used to do the analysis and obtain the real and imaginary numbers.  These numbers will be connected to cartopol~ to be converted to phase and amplitude information.  FFTin~ to cartopol~ is generally used a lot for spectral processing in Max/MSP so remembering this 2 objects is useful and important.

The vectral~ object will be used at this point to track the amplitude information by frame.  The output of this is then subtracted from the current amplitude number and sqrt~ to make everything “logarithmic”.

The last part of the process is obtaining the analysis information as a number outside of the subpatch.  If fftout~ 1 is used, the program will think that you are resynthesizing a sound. Instead fftout~ 1 nofft is used to create an outlet for pfft~ and output the analysis number.  The nofft flag will not use an ifft to resynthesize and instead acts as a regular output.

Screen Shot 2016-02-04 at 12.59.53 PM.png


Real-Time Granular Synthesis

Granular synthesis is a tool that takes a sound and chops it into little pieces.  Each piece has its own window and can potentially have its own panning, duration, silence and transposition.  Granular synthesis in music is analogues to pointillism in painting.  Granular synthesis ca also be seen as a cloud of small fragmented sound akin to throwing a handful of sand into the air and each piece of sand is a sound.  There are many ways to design a granular synthesizer.  In this short post I will demonstrate one simply way to achieve granular synthesis in real-time.

In this patch the incoming sound will be windowed.  The length of the window will be set by the user or randomly chosen.  To start we will make a buffer called window.  A message box with the statement sizeinsamps 1024, fill 1, apply hamming, will create a hamming envelop in the buffer.  Any envelope can work and the user can substitute their own.  We will be using index~ to read back this buffer.  Connected to index will be a line~ object with a message saying 0, 1024 $1.  The 1024 is the number of samples and can be user defined.  The $1 is time and can be set in a variety of different ways.

I am using tapin~ and tapout~ to add a little bit of delay to the signal, but this step is not necessary.  To trigger a grain I am using a metro that is connected to a random object.  Every time the random object picks a number it also uses that number to set the metro time in ms as well as the window time.  The random can have any range or a controllable range however + 1 is needed to prevent 0 from occurring.

In the below example I am also panning using 2 scale objects on sqrt.  The metro is also triggering a random value that controls where in space the grain is being played.  This means that each grain has a different space.

Screen Shot 2015-11-02 at 3.27.10 PM

In this example feedback can be added after the *~ that index~ is connected to.  This will create a more complex sound by adding granulated iterations back to the signal to be granulated.

Looking at Sound with Jitter

When I am designing sound I use a sonogram and oscilloscope a lot.  the sonogram gives me the spectrum of the sound while the oscilloscope gives me the wave form.  I mainly use the oscilloscope to look for dc offset or in the case of noisy sounds, look for periodicity.  Max/MSP has a built in scope (scope~) but the user cannot pause it or freeze it so therefore I made my own.

To do this I used jit.catch~ to grab audio and turn it into a matrix.  If you don’t know what that is, think of it as an xy plain with a certain amount of dimensions.  The image below is how cycling74 shows what a jitter matrix is.  As you can easily see it is ARGB plains with a dimension of 8×6.  Each box holds a value between 0 and 255.

image007

Once the sound is converted into a matrix we can use jit.graph to graph the information from the matrices.  Jit.graph has 4 different modes which can be used to visualize the waveform in different ways and by adding @frgb you can change the color of the waveform.  The last argument we have to add to the jit.graph object is @clearit 1.  This refreshes the screen every frame and makes it so the wave does not write over itself.  Lastley, a qmetro is used to trigger a new frame to appear.  This acts to slow down the frames and or freeze one.  This qmetro is the entire reason I made my own scope.  It gives me the power to pause and look at an instance of the sound.

Screen Shot 2015-10-14 at 12.22.50 AM

Here is the max patch that I made.  I am using a basic ring modulation and running it through jit.catch~ at mode one (it says mode 0, but @mode 1 is the default).  Qmetro 2 sends a bang every 2 milliseconds, therefore making jit.catch~ release a frame every 2 milliseconds.

*If you like these little tutorials or if there is something you want to see please let me know.

Writing Sample Values into Buffers

Wavetables and buffers store sample information of the sound that can be used/manipulated at a later time.  Buffers are also what store audio that you are recording for later use.  While recording sounds and or loading sound is fun, sometimes algorithmically generating a buffer can yield interesting timbres. In this short post I will be looking at one way to generate a buffer that produces a fun noisy timbre.

First we will set Max/MSP up to write a buffer with the click of a button.  First we will create a buffer (buffer~), name it whatever you like and give it a time of 11.61.  This is how many milliseconds the buffer will be. This number can change or scaled to accommodate for more values. 11 milliseconds is about 512 samples so you would need 22 milliseconds for 1024 etc.

The main object that will release numbers is uzi.  uzi will count up to whatever number you give it in order.  This is how we are indexing sample values as well as creating sample values.  Uzi needs to release its numbers into an expression.  The expr object is what you would use to write an expression.  In my example below the expression is (cos($i1)/511) * 500.  I am using t i i to release the numbers generated by uzi into different objects without having timing issues. Pack is then used to gather the index and the value and send them together to peek~.

Screen Shot 2015-10-11 at 11.34.37 PM

To play the sound I am using wave~ to play the buffer back as a period wave.  You can also use play~ to read the buffer at different speeds.

Screen Shot 2015-10-11 at 11.37.24 PM

This same method can be used to write windows for granular synthesis and by using index~ to read it back for amplitude values. Either way, writing your own buffer for wavetable synthesis, granular synthesis or windowing is a very important technique that can yield rich results.

Related to Amplitude Modulation

Amplitude modulation is a fundamental synthesis technique that can be heard in all types of music from the avant-garde to dub step (wobble bass).  This technique is the idea behind an LFO and can be related to tremolo because only the amplitude is being affected.

Amplitude Modulation is similar to Ring Modulation but the modulation is uni-polar instead of bi-polar.  this means that the modulation frequencies samples get scaled from -1.0 -> 1.0, to 0.0 -> 1.0.  This is very important because in amplitude modulation we are not trying to change the frequency.

Screen Shot 2015-09-07 at 4.32.58 PM Screen Shot 2015-09-07 at 4.33.14 PM

As you can se the wave “bounces” or the volume increases and decreases at a steady rate.  This occurs when the modulation frequency is at sub audio rate or below 20 Hz.

Just like Ring Modulation, Amplitude Modulation creates other frequencies that are so close together they are not heard when the modulator is below 20 Hz.  These frequencies can be calculated by Carrier Frequency + Modulation Frequency, Carrier Frequency – Modulation Frequency and just the Carrier Frequency.  Unlike Ring Modulation the Carrier Frequency will always be heard and will not change even if the Modulation Frequency is above 20 Hz.

Screen Shot 2015-09-07 at 4.37.46 PM

When the Modulation Frequency is above 20 Hz the C+M and C-M start to get further away from each other and eventually sound like 2 separate frequencies with the Carrier remaining the same.  In the above example the Carrier Freuqnecy is 440 and the Modulation Frequency is 2000.  This would give us 3 frequencies at 440, 2440 and 1560.  When the Modulation Frequency is lower the frequency are closer together, but still can be heard separately.

With complex Carrier Frequencies the spectrum becomes ver full because each harmonic is producing 2 other frequencies and keeping the harmonic heard.

Screen Shot 2015-09-07 at 4.42.51 PM

This is a Square Wave run through an Amplitude Modulator.  As you can see it looks like a Square Wave.

Screen Shot 2015-09-07 at 4.44.05 PM

This is a Square Wave through an Amplitude Modulator with a Modulation Frequency of 2000 Hz.  The spectrum fills out and the sound changes from a classic Square Wave sound to a sound that has a lot more buzz/crunch to it. As the Modulation Frequency gets higher higher partials start to be heard more and the structure of the Square Wave changes.

Screen Shot 2015-09-07 at 4.47.51 PM

While Amplitude Modulation is always thought of with the modulator below 20 Hz, I encourage everyone to break that thought and experiment with all frequencies and even different types of waves for the modulator.  Amplitude Modulation is a building block to creating interesting and complex sounds.  By “breaking the rules” new sounds can emerge like the one below that uses a Sawtooth Wave for the modulator with a frequency of 5000 Hz.

Screen Shot 2015-09-07 at 4.51.29 PM

Thoughts About Ring Modulation

Ring Modulation is easy to make technique in a program such as Max/MSP that yields fun and interesting results.  This sound synthesis technique uses a bi-polar modulation signal.  The frequencies produced can be calculated by saying Carrier Frequency + Modulation Frequency and Carrier Frequency – Modulation Frequency

.Screen Shot 2015-09-05 at 10.35.14 PM

Even When the modulation frequency is below 20 Hz  the C+M and C-M frequencies are produced but are critical bands because they are perceived as a beating pattern and not two separate signals.  In the above example the two frequencies are 439 and 441.  They are close enough together to produce a pulse without much change in pitch.

Screen Shot 2015-09-05 at 10.38.45 PM

Now the modulator is 2000 Hz.  Two distinct pitches are produced at 2440 and 1560. This relationship will always occur until two distinct pitches are heard that seem to not influence one another.

With complex sounds the result is more interesting.  When the modulation frequency is higher than 20 Hz each frequency in the sound will produce 2 frequencies in the C+M and C-M relationship.

Screen Shot 2015-09-05 at 10.43.30 PM

This shows a regular square wave with the modulation frequency of 1 Hz.  It looks like a regular square and the C+M, C-M relationship is not seen because the frequencies are too close.

Screen Shot 2015-09-05 at 10.45.30 PM

Now that the modulation frequency is 2000 Hz each frequency in the square is producing 2 frequencies and the spectrum doubles in size and the sound changes.

Ring modulation can be used live as well to create vibrato and also exploited (modulator with higher frequencies) to alter the sound drastically and create interesting pitch relationships.